by Noelle Kreider
 The “flipped classroom” model of learning proposes using online resources to introduce concepts or skills during homework time, reserving class time for discussion and more complex tasks. Whether your students have home access or not, they can benefit from this flipped model. Using the tools presented here, you can create, deliver, and monitor online resources that students use at home or in class to independently develop basic understandings. This frees up your instructional time for small groups, checking understanding, implementing projects, etc.
View my presentation from the MaTHink Conference at the Riverside County Office of Education. This presentation focuses on the use of the Livescribe pen, Screencast-o-matic, and SideVibe to develop video tutorials and digital learning pathways. Links are embedded throughout the presentation to examples and related resources.
Presentations
by Noelle Kreider
Helping Students Find Quality Information and Write Better Reports
The Internet is a vast repository of information – the good, the bad, and the ugly! Discover how to guide your students to the good stuff, safely and efficiently. Help them organize information from multiple sources, validate its accuracy, and improve their writing.
View Presentation from Rialto USD Gifted and Talented Education Conference.
Presentations
by Noelle Kreider
The Common Core Standards call for collaborative writing and the integration of technology. Discover how to use student blogs to improve writing and engage students in peer feedback, while maintaining safety and security for students. Have fun using Google Docs for shared writing activities.
View Presentation from Rialto USD Gifted and Talented Education Conference.
Presentations
by Noelle Kreider
Create, Manage, and Monitor Web-based Learning
Discover easy to use tools to create online tutorials for your class. Then use these and other online resources to create digital learning pathways for students and check their understanding as they progress.
View Presentation from Rialto USD Gifted and Talented Education Conference
Presentations
by Noelle Kreider
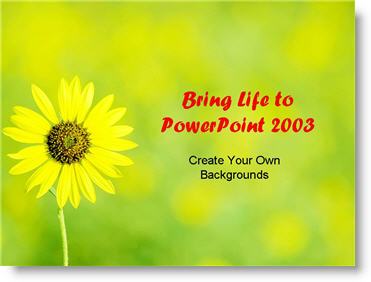
 If you are having to work with PowerPoint 2003, you have probably used every slide design (background) so many times they are starting to make you sick. And your students are probably feeling the same way. You can instantly lose credibility with the current generation if your presentation is “old-looking.” Perhaps you have searched for templates online, but I often find this more frustrating than useful – most templates are for newer versions of PowerPoint or don’t fit the topic very well. Save time and make your own backgrounds that add interest and sophistication to your presentations.
PowerPoint builds your slides using a slide master. You can easily add images to this master for a unique presentation design. Watch this video to see how and use the directions below to guide you as you try it on your own.
- In PowerPoint 2003, go to the View menu –> Master –> Slide Master.
- Right-click the slide master in the left sidebar and click New Title Master.
- In the Insert menu –> Picture –> Clipart or From File.
* If you choose clipart, you can use the copyright free images built into MS Office.
* If you choose From File, you can insert a copyright free image from the web or one you created with your own camera or drawing software.
- Once you have your picture on the slide, you can position it and use the picture tools to edit it.
* If you click on the picture and don’t see the picture toolbar, go to the View menu –> Toolbars –> Picture Toolbar. The Draw toolbar is also helpful when working with images.
- Once you have your image the way you want it, right-click and choose Send to Back so it will be put behind your text boxes.
- Adjust the location, fonts, and animations of your text boxes as desired.
- Click the Close Master View button and your slides will have new backgrounds.
Did you find this helpful? Did you run into problems? Post a comment to let me know!
Blogstitute 2012 How-to's